SwiftUI Cheatsheet
In June 2025 I started working thru 100 Days of SwiftUI. It’s a great course, and I am truly impressed how much quality content & courses Paul Hudson is providing - and maintaining!! Paul, thank you sooo much for this! 🙏🏼
But it’s a lot of content, so here are my notes - hopefully in a easy-to-navigate cheatsheet format. I have a rough structure in mind, but I will only fill in the content when I need it. So don’t expect a complete overview!
Swift
For an all in overview, see Learn essential Swift in one hour.
In the following chapter I have just added the parts I needed to check on at least once.
struct & computed properties
struct Employee {
    let name: String
    var vacationAllocated = 14
    var vacationTaken = 0

    var vacationRemaining: Int {
        vacationAllocated - vacationTaken
    }
}
Optionals
- Optionals let us represent the absence of data, which means we’re able to say “this integer has no value” – that’s different from a fixed number such as 0.
- Example:
var str:String?can hold a String or nil - As a result, everything that isn’t optional definitely has a value inside, even if that’s just an empty string.
- Unwrapping an optional is the process of looking inside a box to see what it contains: if there’s a value inside it’s sent back for use, otherwise there will be nil inside.
- We can use
if letto run some code if the optional has a value, or guard let to run some code if the optional doesn’t have a value – but with guard we must always exit the function afterwards.
func printSquare(of number: Int?) {
    guard let number = number else {
        print("Missing input")
        return
    }

    print("\(number) x \(number) is \(number * number)")
}
- The nil coalescing operator, ??, unwraps and returns an optional’s value, or uses a default value instead.
let new = captains["Serenity"] ?? "N/A"
- Optional chaining lets us read an optional inside another optional with a convenient syntax.
- If a function might throw errors, you can convert it into an optional using try? – you’ll either get back the function’s return value, or nil if an error is thrown.
Protocols and Extensions
protocol Vehicle {
    func estimateTime(for distance: Int) -> Int
    func travel(distance: Int)
}
extension String {
    func trimmed() -> String {
        self.trimmingCharacters(in: .whitespacesAndNewlines)
    }
}
Arrays & sorting
All arrays have built-in sort() and sorted() methods that can be used to sort the array.
sort()sorts the array in-placesorted()returns a new, sorted array.
If the array is simple you can just call sort() directly, like this, to sort an array in place:
var names = ["Jemima", "Peter", "David", "Kelly", "Isabella"]
names.sort()
If you have more complex structs, you need to pass along the comparison:
struct User {
    var firstName: String
}

var users = [
    User(firstName: "Jemima"),
    User(firstName: "Peter"),
    User(firstName: "David"),
    User(firstName: "Kelly"),
    User(firstName: "Isabella")
]

users.sort {
    $0.firstName < $1.firstName
}
We can make our own types conform to Comparable, and when we do so we also get a sorted() method with no parameters. This takes two steps:
- Add the
Comparableconformance to the definition of User. - Add a method called
<that takes two users and returns true if the first should be sorted before the second.
Here’s how that looks in code:
struct User: Identifiable, Comparable {
    let id = UUID()
    var firstName: String
    var lastName: String

    static func <(lhs: User, rhs: User) -> Bool {
        lhs.lastName < rhs.lastName
    }
}
Strings
- They are special, and there is a lot to know…
- This doesn’t work:
let name = "Paul"
let firstLetter = name[0]
Dates
Date, DateComponents, and DateFormatter
enum
enum are created like so:
enum Weekday {
    case monday, tuesday, wednesday, thursday, friday
}
A switch statement with enum looks like this:
switch loadingState {
case .loading:
    LoadingView()
case .success:
    SuccessView()
case .failed:
    FailedView()
}
SwiftUI
- Interactful is a nice tool to navigate and play around the different Views & components.
- Human Interfaces Guideline
Views
- Everything is a view in SwiftUI 😜
- Running code when a view is shown, using
onAppear().
Even ForEach is a view, that’s why we can write
ForEach(0..<5) {
    Text("Row \($0)")
}
Note: We can’t write ForEach(0..<5), because ForEachexpects a Range<Int>, not a ClosedRange<Int>!
ForEach View
ForEach is a view, that is made up the sub-views created in every loop instance.
We typically use it to create sub-views based on a counter or an array.
ForEach with an array:
import SwiftUI

struct ContentView: View {
  let items = ["Apple", "Banana", "Cherry"]

  var body: some View {
    List {
      ForEach(items, id: \.self) { item in
        Text(item)
      }
    }
  }
}
Data Entry
TextField
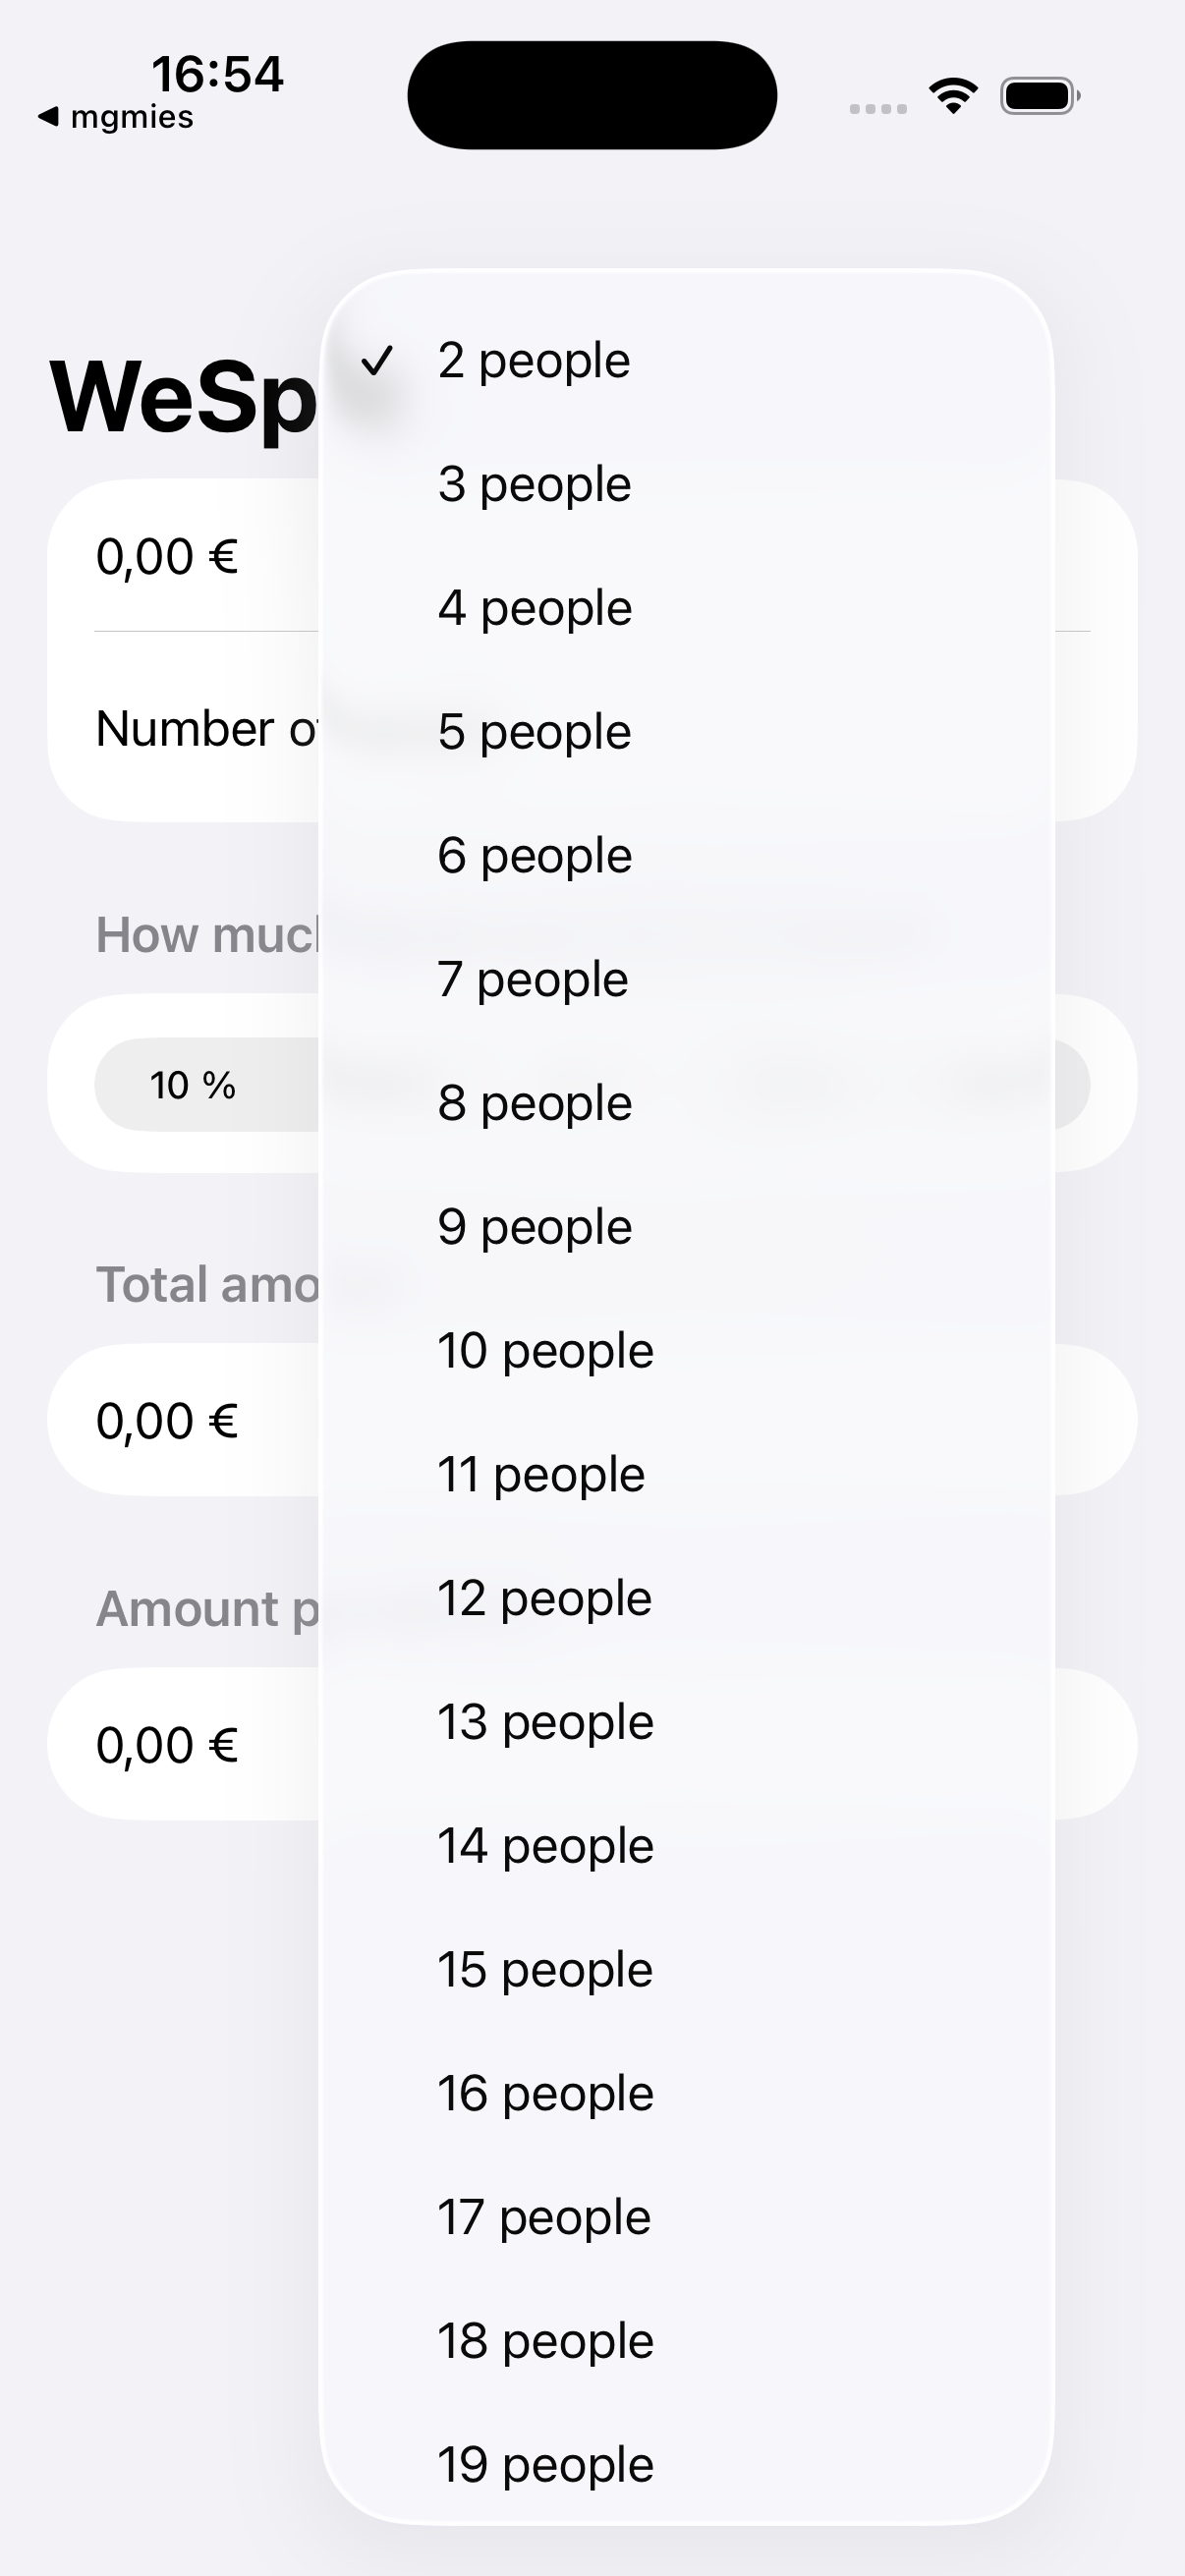
Picker
Picker is used to pick one out of many possible selections.
A regular picker looks like this:
Picker("Number of people", selection: $numberOfPeople) {
    ForEach(2 ..< 100 , id: \.self) {
        Text("\($0) people")
    }
}
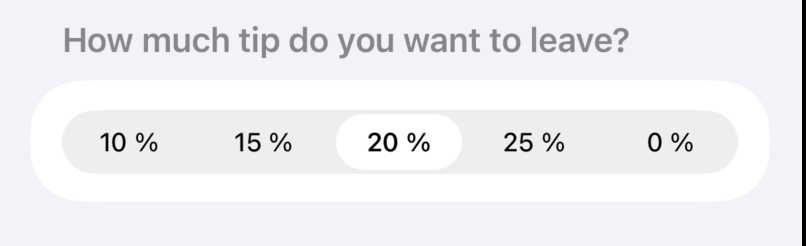
A Picker can be modified with the PickerStyle modifier:
Picker("Tip percentage", selection: $tipPercentage) {
    ForEach(tipPercentages, id: \.self) {
        Text($0, format: .percent)
    }
}
.pickerStyle(.segmented)
Stepper
 A stepper is a two-segment control that people use to increase or decrease an incremental value.
@State private var count: Int = 0

var body: some View {
    Stepper("\(count)",
        value: $count,
        in: 0...100
    )
}
DatePickerfor Dates. Using thedisplayedComponentsparameter to control dates or times.FormPicker- Navigation Bar
Alerts & Confirmation Dialogs
Alerts
Alerts are an extension to a View with a Bool variable that decides on wether they are shown or not.
struct ContentView: View {
    @State private var showingAlert = false

    var body: some View {
        Button("Show Alert") {
            showingAlert = true
        }
        .alert("Important message", isPresented: $showingAlert) {
            Button("OK") { }
        }
    }
}
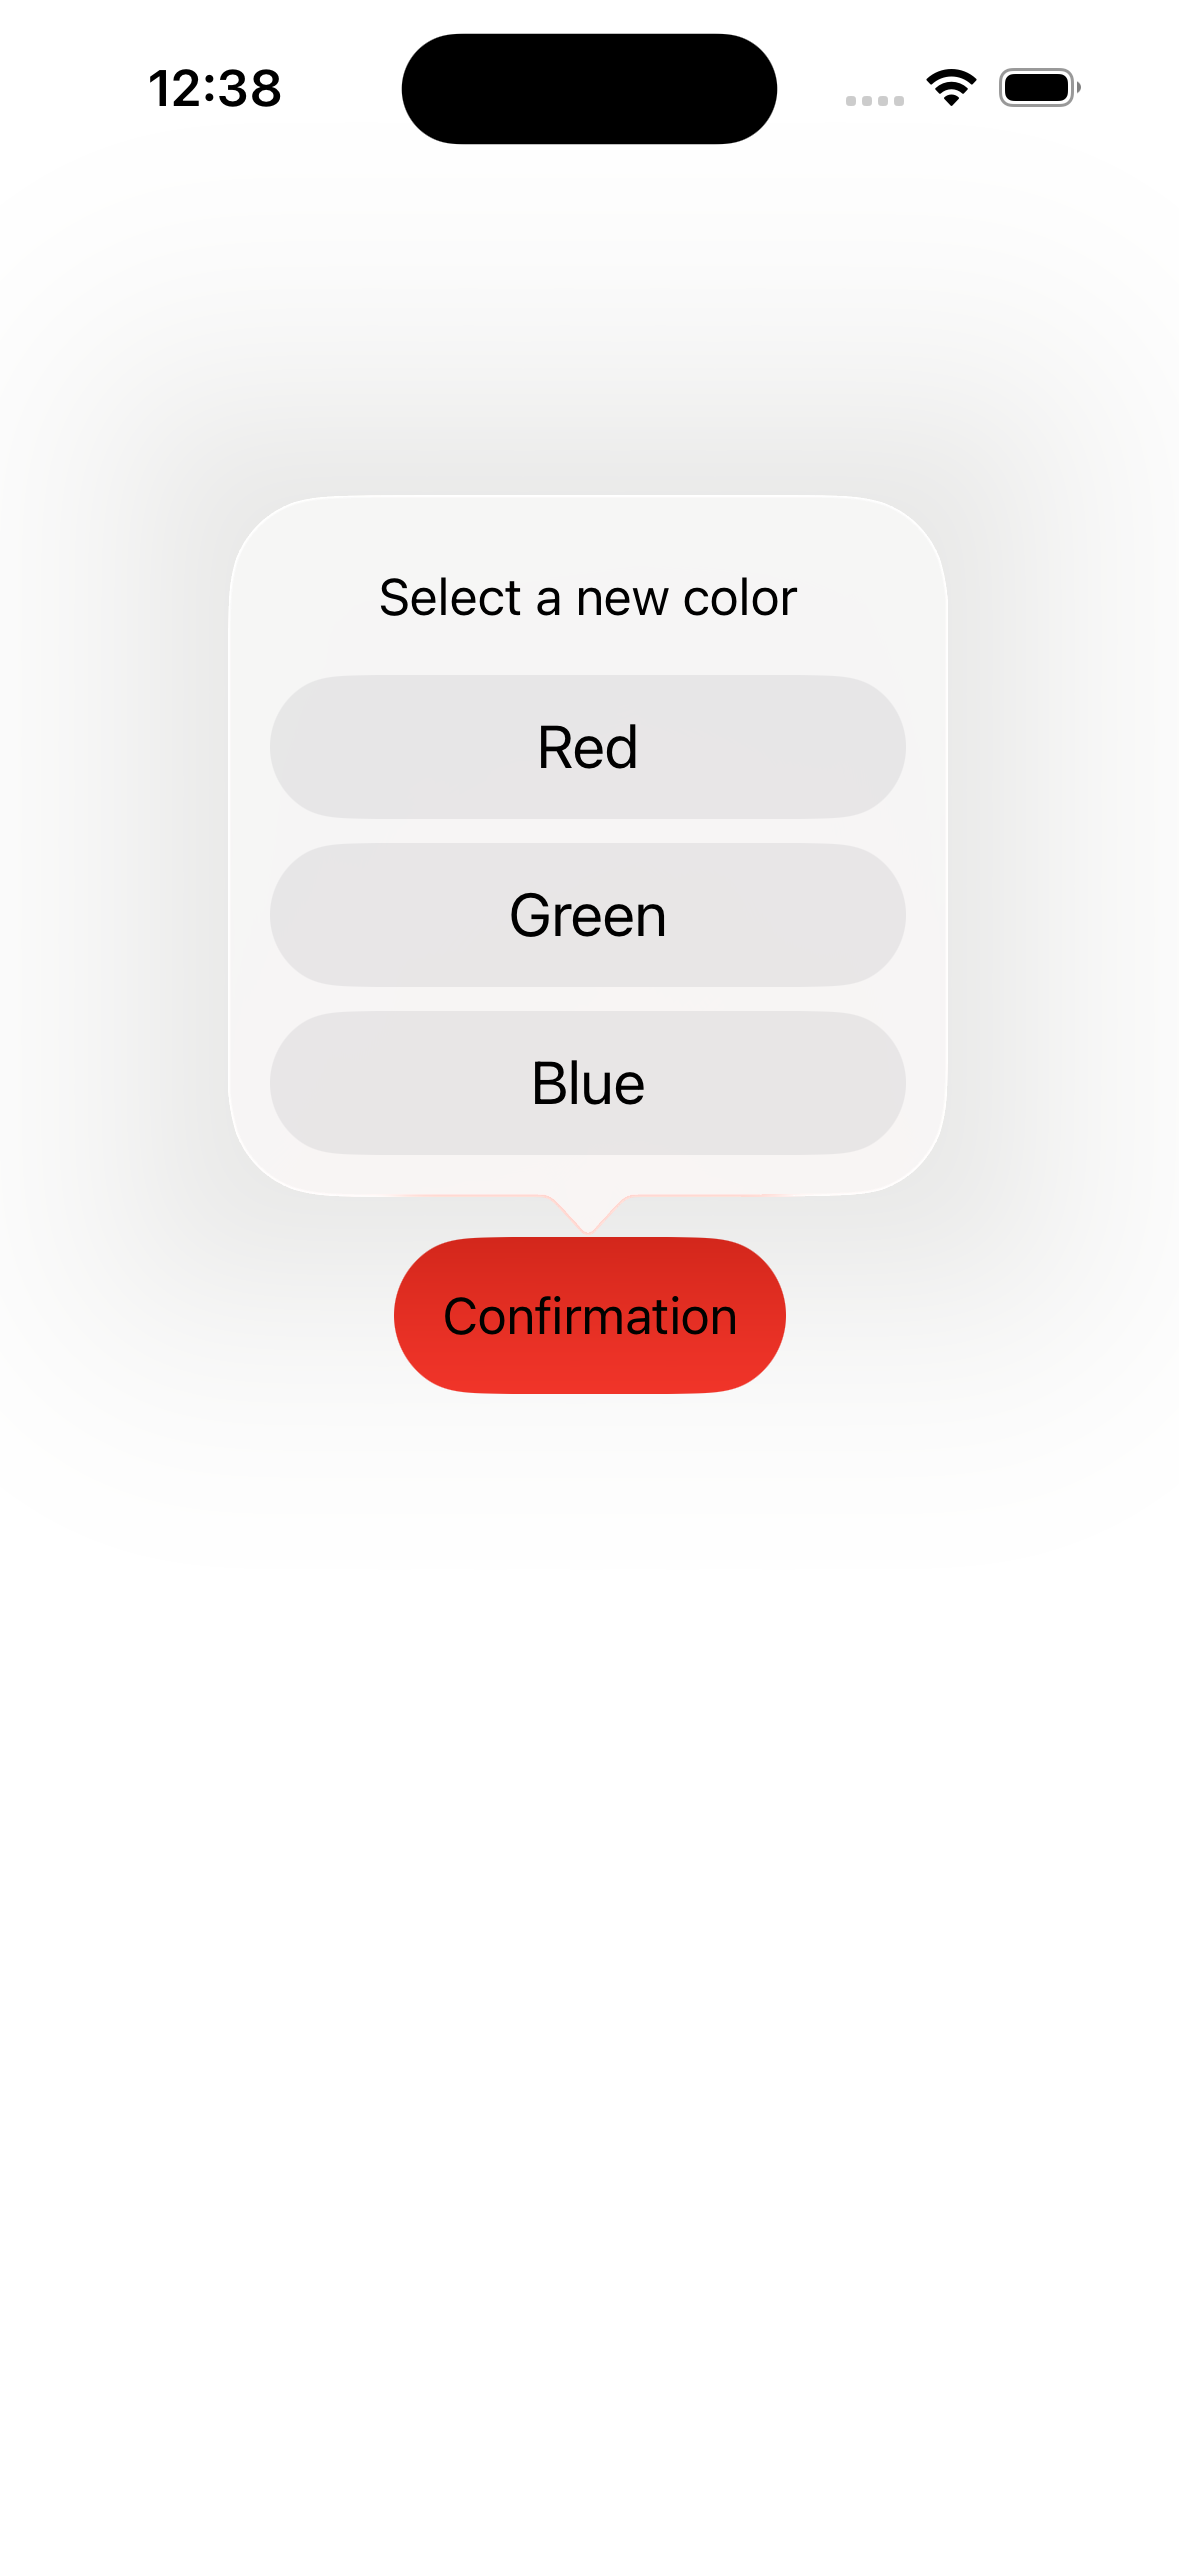
Confirmation Dialogues
Use them when many buttons / options are available. For example code check ou this repo.
Note: Pre-iOS 26 they slid in from the bottom, in iOS 26 they show up inside the screen.
Confirmation Dialog in iOS 18.5:

Confirmation Dialog in iOS 26:
Text
Text is a Text field that describes text.
Note: Text fields with different styling can be plused together to form one large text field with parts with different styling inside:
Text(page.title)
    .font(.headline)
+ Text(": ") +
Text("Page description here")
    .italic()
And you get a text with different stylings combined:

Lists
Building scrolling tables of data using List, in particular how it can create rows directly from arrays of data.
List {
    Section {
        Label("Sun", systemImage: "sun.max")
        Label("Cloud", systemImage: "cloud")
        Label("Rain", systemImage: "cloud.rain")
    }
}
Buttons in Lists: When you place a button in a list, the ENTIRE list element become clickable! If there are more than one button in a list, wherever you click on the list element, it clicks ALL the buttons one after the other!
To fix that and get the behaviour we want, use .buttonStyle(.plain)
Same is true for HStack:
HStack {
    if label.isEmpty == false {
        Text(label)
    }

    ForEach(1..<maximumRating + 1, id: \.self) { number in
        Button {
            rating = number
        } label: {
            image(for: number)
                .foregroundStyle(number > rating ? offColor : onColor)
        }
    }
}
.buttonStyle(.plain)
Images
struct ContentView: View
{
var body: some View {
Image (example)
    .resizable ()
    .scaledToFit ()
    .frame(width: 300, height: 300)}
}

Replace ScaledToFit by ScaledToFill and get

struct ContentView: View {
    var body: some View {
        Image (•example)
            .resizable ()
            .scaledToFit()
            .containerRelativeFrame(horizontal) { size, axis in
            size * 0.8
            }
    }
}

Toolbar
Bundle
Reading files from our app bundle by looking up their path using the Bundle class, including loading strings from there.
Animations
Covered in Day 32-34. TODO I need to watch the clips again to extract my notes/cheatsheet.
- Creating animations implicitly using the
animation()modifier. - Customizing animations with delays and repeats, and choosing between ease-in-ease-out vs spring animations.
- Attaching the animation() modifier to bindings, so we can animate changes directly from UI controls.
- Using
withAnimation()to create explicit animations. - Attaching multiple
animation()modifiers to a single view so that we can control the animation stack.
Loading Data
If it’s synchronous:
View...
    .onAppear(loadIt)
?? How is it done, when loadIt is async??
Passing & returning values to/from views
As seen in Selecting and editing map annotations
Imagine I have a View that is opened as Sheet and gets in a Location (being a self defined struct):
struct EditView: View {
    @Environment(\.dismiss) var dismiss
    var location: Location

    @State private var name: String
    @State private var description: String

    var body: some View {
        NavigationStack {
            Form {
                Section {
                    TextField("Place name", text: $name)
                    TextField("Description", text: $description)
                }
            }
            .navigationTitle("Place details")
            .toolbar {
                Button("Save") {
                    dismiss()
                }
            }
        }
    }
}
To pass in the Location I make an extra initializer:
init(location: Location) {
    self.location = location

    _name = State(initialValue: location.name)
    _description = State(initialValue: location.description)
}
Tu return data to the calling code, I pass in a method onSave. First create an additional var in my View struct:
var onSave: (Location) -> Void
and then extend the initializer like so:
init(location: Location, onSave: @escaping (Location) -> Void) {
    self.location = location
    self.onSave = onSave

    _name = State(initialValue: location.name)
    _description = State(initialValue: location.description)
}
That @escaping part is important, and means the function is being stashed away for user later on, rather than being called immediately, and it’s needed here because the onSave function will get called only when the user presses Save.
Sheets & NavigationStacks
To open a view as sheet:
struct ContentView: View {
    @State private var showingAddExpense = false

    var body: some View {
        NavigationStack {
            VStack {
                // Some code here
            }
            .navigationTitle("iExpense")
            .toolbar {
                Button("Add Expense", systemImage: "plus") {
                    showingAddExpense = true
                }
            }
            .sheet(isPresented: $showingAddExpense) {
                AddView(expenses: expenses)
            }
        }
    }
}
Networking
This is how you send something to an HTTPS Endpoint:
 func placeOrder() async {
        guard let encoded = try? JSONEncoder().encode(order) else {
            print("Failed to encode order")
            return
        }

        let url = URL(string: "https://reqres.in/api/cupcakes")!
        var request = URLRequest(url: url)
        request.setValue("application/json", forHTTPHeaderField: "Content-Type")
        request.httpMethod = "POST"

        do {
            let (data, other) = try await URLSession.shared.upload(for: request, from: encoded)

            let decodedOrder = try JSONDecoder().decode(Order.self, from: data)
            confirmationMessage = "Your order for \(decodedOrder.quantity)x \(Order.types[decodedOrder.type].lowercased()) cupcakes is on its way!"
            showingConfirmation = true
        } catch {
            print("Check out failed: \(error.localizedDescription)")
        }
    }
Saving Data
I know 3 ways to save data in Swift/UI:
- UserDefaults: Best used to save small data quantities. For example App Settings.
- Writing it to the documents directory
- SwiftData
Writing & reading to UserDefaults
We need a couple of things:
- Our data has to be
Codable, so that later we can createJSONEncoder - UserDefaults to save and load our data
- A custom initializer for the data class, so it automatically loads
- A
didSetto the data, so whenever data is added or changed it gets automagically saved.
Making the data Codable most often is not too hard: As long as the components are Codable, the entire class is also.
This is what saving the data in a didSet can look like:
var items = [ExpenseItem]() {
    didSet {
        if let encoded = try? JSONEncoder().encode(items) {
            UserDefaults.standard.set(encoded, forKey: "Items")
        }
    }
}
And this is how a initializer that loads the data could look like:
init() {
    if let savedItems = UserDefaults.standard.data(forKey: "Items") {
        if let decodedItems = try? JSONDecoder().decode([ExpenseItem].self, from: savedItems) {
            items = decodedItems
            return
        }
    }

    items = []
}
Writing & reading to the documents directory
This is how we write:
let data = Data("Test Message".utf8)
let url = URL.documentsDirectory.appending(path: "message.txt")

do {
    try data.write(to: url, options: [.atomic, .completeFileProtection])
} catch {
    print(error.localizedDescription)
}
..and this is how we read:
let url = URL.documentsDirectory.appending(path: "message.txt")

do {
    let input = try String(contentsOf: url)
    print(input)
} catch {
    print(error.localizedDescription)
}
SwiftData
The moving parts we have are
- The
Model: This is the data structure. The object(s) and it’s fields - The
ModelContainer: This is the persistent storage. Think of it like the file in which the data is written on the server. - The
ModelContext: That’s the in-memory kept version of your data and where the data modifications are held before being saved to theModelContainer.
To enable your software to use SwiftData, make a model first:
import Foundation
import SwiftData

@Model
class Book {  // Models HAVE TO BE Classes!
    var title: String
    var author: String
    var genre: String
    var review: String
    var rating: Int
}
Add the modelContainer at App level
import SwiftData
import SwiftUI

@main
struct BookwormApp: App {
    var body: some Scene {
        WindowGroup {
            ContentView()
        }
        .modelContainer(for: Book.self)
    }
}
Use the data in your view:
struct ContentView: View {
    @Environment(\.modelContext) var modelContext
    @Query(sort: [
        SortDescriptor(\Book.title),
        SortDescriptor(\Book.author)
    ]) var books: [Book]
    ...
Pass a SwiftData object to a down stream View:
struct DetailView: View {
    @Environment(\.modelContext) var modelContext

    let book: Book
    ...
Add a SwiftData object:
struct AddBookView: View {
    @Environment(\.modelContext) var modelContext
    var body: some View {
        NavigationStack {
            Form {
                // Data entry here
                Section {
                    Button("Save") {
                        let newBook = Book(title: title, author: author, genre: genre, review: review, rating: rating)
                        modelContext.insert(newBook)
                        dismiss()
                    }
                }
            }
            .navigationTitle("Add Book")
        }
    }
}
Delete a SwiftData object:
    func deleteBook() {
        modelContext.delete(book)
        dismiss()
    }
Adding a context and sample data for #Preview:
#Preview {
    do {
        let config = ModelConfiguration(isStoredInMemoryOnly: true)
        let container = try ModelContainer(for: Book.self, configurations: config)
        let example = Book(title: "Test Book", author: "Test Author", genre: "Fantasy", review: "This was a great book; I really enjoyed it.", rating: 4)

        return DetailView(book: example)
            .modelContainer(container)
    } catch {
        return Text("Failed to create preview: \(error.localizedDescription)")
    }
}
Core Image (Image Filters)
It’s tricky… Look at the class explaining it here
TODO
- Explain the different classes / objects there are, what functionality is provided by which one, and how to transistion from one to the other: SwiftUI.Image - CGImage - CIImage
- Explain the context & filter concept.
- Give example
MapKit
- Maps Video
import MapKitMap()shows a map ;).mapStyle(.imagery)or.hybridor.mapStyle(.hybrid(elevation: .realistic))- Entering locations as
MapCameraPosition:
let startPosition = MapCameraPosition.region(
    MKCoordinateRegion(
        center: CLLocationCoordinate2D(latitude: 56, longitude: -3),
        span: MKCoordinateSpan(latitudeDelta: 10, longitudeDelta: 10)
    )
)
- Getting Map taps as coordinates with
MapReader, i.e. calculation from Screen Coordinates —> Long/Lat
MapReader { proxy in
    Map(initialPosition: startPosition)
        .onTapGesture { position in
            if let coordinate = proxy.convert(position, from: .local) {
                print("Tapped at \(coordinate)")
            }
        }
}
- Have
Markeron maps
Other topics
- Machine Learning
- Crashing your code with
fatalError(), and why that might actually be a good thing. - How to check whether a string is spelled correctly, using
UITextChecker(it’s a messy beast). - Using
DragGesture()to let the user move views around, then snapping them back to their original location. - Bundles: How to put a file
whatever.txtin your bundle, how to access (i.e. read it). File names need to be unique throughout a bundle.
Questions & Todos
- What are the differences between a
Formand aVStack? - Multi screen setups:
SheetandNavigationStack, and how to move around NavigationStack(path)- Binding:
@State,@Bindable,@Binding - How to pass data around multi screen setups
- TODO: Understand differnece in behaviour and look of Alert and Confirmation Dialogue.